We have all heard the golden rule of woodworking: “Measure Twice, Cut Once.”
But what if you don’t know how to measure correctly in the first place?
I remember my first project—a simple bookshelf. I measured the wood, cut it, and tried to fit the shelf. It was too short. I measured again. It was still too short. I was frustrated and confused.
It turned out, I wasn’t reading the tiny lines on the tape measure correctly. I was confusing the 1/8th mark with the 1/16th mark. That tiny difference ruined my expensive wood.
In this guide, we will break down the “code” of those confusing little lines and teach you the professional tricks to get perfect measurements every time.
1. The Anatomy of Your Tape Measure
Before we look at the lines, let’s look at the tool itself. A standard tape measure has three main parts you need to know:
-
The Case: The body of the tape. (Pro Tip: Look at the back of the case. It usually has a number, like “3 inches.” This is the width of the case itself, which is useful for inside measurements).
-
The Blade: The yellow metal strip with the numbers.
-
The Hook: The metal piece at the very end. (We will talk about why this moves later—it’s important!).
2. Deciphering the Lines (The Math Made Easy)
This is where most beginners get lost. A standard imperial tape measure (used in the US and often in woodworking plans) breaks an inch down into 16 parts.
Think of it like slicing a pizza.
The Whole Inch (The Big Number)
These are the large numbers (1, 2, 3…). They usually go across the entire width of the tape. This is your starting point.
The Half Inch (1/2″)
This is the longest line between the inch marks. It cuts the inch exactly in middle.
The Quarter Inch (1/4″)
Now, cut those halves in half. These lines are slightly shorter than the 1/2″ line.
-
There are four quarters in an inch: 1/4, 2/4 (which is 1/2), 3/4, and 4/4 (which is the next inch).
The Eighth Inch (1/8″)
Cut the quarters in half again. These lines are even shorter.
-
This is the most common measurement for general construction.
The Sixteenth Inch (1/16″)
These are the tiniest lines on most tapes.
-
If you need a “perfect fit” for a joint, you are measuring to the 1/16th.
Beginner Trick: Don’t try to do the math in your head. Just count the tiny lines! If you count 5 tiny lines past the 3-inch mark, that is 3 and 5/16 inches.
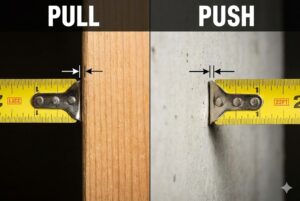
3. The Secret of the “Moving Hook”
Have you ever noticed that the metal hook at the end of your tape is loose? It wiggles back and forth.
Do not fix it! It is not broken.
This is a design feature called the “Floating Hook.” It moves exactly 1/16th of an inch (the thickness of the hook itself) to ensure accuracy.
-
Outside Measurement (Pulling): When you hook the tape onto the end of a board and pull, the hook slides out. This creates a gap to account for the thickness of the hook.
-
Inside Measurement (Pushing): When you push the tape against a wall, the hook slides in. This removes the thickness of the hook from the measurement.
If you hammer that rivet tight, your measurements will always be wrong by 1/16th of an inch!
4. Pro Technique: “Burning an Inch”
Sometimes, the hook at the end of your tape gets bent or worn out. Or maybe you need extreme precision. In this case, woodworkers use a technique called “Burning an Inch.”
How to do it:
-
Instead of starting at the hook (0), start your measurement at the 1-inch mark.
-
Hold the 1-inch mark exactly on the edge of your wood.
-
Measure your length (let’s say it reads 10 inches).
-
Subtract 1 inch from the final number. (So, the real length is 9 inches).
Warning: The biggest mistake with this technique is forgetting to subtract the inch at the end!
5. The “Crow’s Foot” Mark
Using a dull pencil can ruin your accuracy. A thick pencil line can be 1/16th of an inch wide!
Instead of drawing a simple line, professional woodworkers draw a “Crow’s Foot” (a V-shape).
-
Draw a “V” shape where the point of the V is exactly on your measurement mark.
-
This points precisely to the spot where you need to cut.
Conclusion: Practice Makes Perfect
Reading a tape measure is a language. At first, you have to translate every line in your head. “Okay, that’s three lines past the half… so that’s… 5/8?”
But after a few projects, you won’t even think about it. You will just see it.
So, grab your tape measure and just start measuring things around your house. Measure your table, your window, your phone. The more you look at those lines, the more natural it will become.
Remember: Measure twice, cut once, and regret nothing.
Frequently Asked Questions (FAQs)
Q: Why does my tape measure have black diamonds on it? A: You might see small black diamonds every 19.2 inches. These are for framing layouts used in construction trusses. For furniture making, you can ignore them.
Q: What are the red numbers every 16 inches? A: These mark standard wall stud spacing. If you are building a shelf to hang on a wall, these numbers help you find the solid wood behind the drywall.
Q: My tape measure snapped back and the hook bent. Is it ruined? A: Likely, yes. If the hook is bent, your “zero” point is gone. You can try to bend it back with pliers, but it’s usually safer to buy a new one or use the “Burning an Inch” method.