Walk into your entryway right now. What do you see?
If you are like most people, you see a pile of shoes. Sneakers kicked off in the corner, boots falling over, and sandals buried underneath. It’s a mess.
You could go to a big-box store and buy a flimsy metal shoe rack for $30 that will bend in a month. OR, you can head to your scrap pile and build a sturdy, custom wooden rack for **$0**.
In this guide, I will show you how to turn that pile of “useless” off-cuts, old fence pickets, or pallet wood into a beautiful tiered shoe rack. It’s functional, it’s free, and it looks a thousand times better than plastic.
This is the ultimate “Scrap Wood Challenge” project.
The Design: Simple “Ladder Style” Slats
We are going to build a classic slat-style rack. Why slats?
Airflow: Shoes need to breathe to dry out and stop smelling. Slats allow air to circulate.
Less Wood: You don’t need wide, expensive boards. You can use narrow strips (1x2s or ripped plywood).
Dirt Drop: Mud and dirt fall through the slats to the floor (easy to sweep) instead of collecting on the shelf.
Materials & Tools List
Materials (The Scavenger Hunt)
Since this is a scrap wood project, the exact list depends on what you have. But here is what you are aiming for:
Legs: 4 pieces of sturdy wood (2x2s are best, or 1x3s). Approx. 20 inches long.
Shelves: Narrow strips of wood. You need about 10-12 strips that are 24-30 inches long.
Sources: Old fence pickets, disassembled pallets, or 3/4 inch plywood strips ripped on a table saw.
Wood Screws: 1.5-inch or 2-inch screws.
Wood Glue: Essential for strength.
Tools Needed
Saw: Miter saw or hand saw.
Drill/Driver: For driving screws.
Sander: To make sure no splinters snag your socks!
Measuring Tape.
Step 1: Determine Your Size
Don’t just build blindly. Measure your space.
Width: How wide is your hallway? (Standard is 24 to 30 inches).
Height: Do you want 2 tiers or 3 tiers? (Allow about 8-10 inches of height between shelves for sneakers/boots).
Depth: 12 inches is usually perfect for most adult shoes.
For this guide, we will build a standard 2-Tier Rack (30″ Wide x 12″ Deep).
Step 2: Prep Your Scrap Wood
This is the hardest part of working with scrap.
De-nail: If using pallets or old fencing, remove all old nails. They will destroy your saw blade!
Rip the Slats: If you have wide boards, use a table saw or circular saw to rip them into narrow strips (about 1.5 to 2 inches wide).
Cut to Length:
Cut 4 Legs at 20 inches long.
Cut 6 Support Rails (for the sides) at 12 inches long.
Cut 10-12 Slat Boards at 30 inches long.
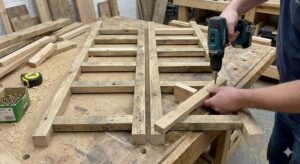
Step 3: Build the “Ladders” (Side Frames)
We will build the two sides first. They look like small ladders.
Lay two Legs flat on your workbench.
Place a Support Rail connecting them at the bottom (2 inches from the floor).
Place another Support Rail connecting them in the middle (10 inches from the floor).
Square it up: Make sure the legs are parallel.
Glue and Screw: Apply glue to the joint and screw the rail into the legs. (Pre-drill holes so the dry scrap wood doesn’t split!).
Repeat: Do the exact same thing for the other side. Now you have two “Ladders.”
Step 4: Attach the Shelves (The Marriage)
Now we connect the two ladders together.
Stand the two ladders up (you might need a helper or lean them against a wall).
Take one Slat Board and place it on the bottom rung of both ladders.
Screw it in place. Now the structure can stand on its own!
Fill it in: Add the rest of the slats.
Spacing: Leave a gap of about 0.5 to 1 inch between each slat. Use a spare piece of wood as a spacer to keep the gaps consistent.
Repeat for the top shelf.
Step 5: The “Wobble Test”
Scrap wood is rarely perfect. Your rack might wobble.
The Fix: Place the rack on a flat surface (like your table saw or kitchen counter). Find the leg that is too short. Use a sander to shorten the other three legs slightly until it sits flat. Or, just stick a felt pad under the short leg!
Step 6: Sanding (Crucial Step)
Since this will hold shoes (and maybe expensive heels or knit socks), you don’t want rough edges.
Sand the edges of the slats thoroughly with 120 grit sandpaper.
Round over the sharp corners of the top shelf so you don’t scratch your legs when walking by.
Step 7: Finishing
You have a few options depending on your “Scrap” aesthetic:
Rustic/Farmhouse: Leave it raw or use a “Dark Walnut” stain.
Modern: Paint the legs white and stain the shelves dark for a trendy two-tone look.
Protection: Since shoes are often wet or muddy, apply a coat of Polyurethane or Varnish. This makes it easy to wipe clean with a damp cloth.
Read More: Polyurethane vs Varnish: Which is Best?
Conclusion
You did it! You took a pile of wood that was destined for the trash and turned it into a functional piece of furniture.
Not only did you save money, but you also decluttered your home. And let’s be honest, seeing your family actually put their shoes on the rack instead of the floor? That’s the real victory.
Got some scrap wood left over? Why not try building a Simple Birdhouse next?
Frequently Asked Questions (FAQs)
Q: Can I use plywood for this? A: Absolutely! Plywood strips are very strong. Just make sure to sand the edges well, as plywood splinters can be sharp.
Q: How much weight can it hold? A: A scrap wood rack like this is surprisingly strong. It can easily hold 30-40 lbs of shoes per shelf. If you want to sit on it (like a bench), you will need to use thicker wood (2x4s) and reinforce the joints.
Q: My screws are splitting the wood. What do I do? A: Old wood is dry and brittle. You MUST drill a pilot hole (a small hole slightly smaller than your screw) before driving the screw. This removes wood to make room for the screw and prevents splitting.