There is something magical about floating shelves. They look like they are hovering in mid-air, defying gravity. They make any room look modern, clean, and expensive.
But if you check the price of custom floating shelves at a furniture store, you might faint. They can cost hundreds of dollars for a single piece of wood!
Here is the secret: You can build them yourself for a fraction of the cost.
And the best part? You don’t need fancy invisible steel brackets or expensive hardware. We are going to build them using a clever “hollow box” method that slides over a strong wooden cleat. It is cheap, incredibly strong, and perfect for beginners.
In this guide, I will walk you through building your own strong, beautiful floating shelves in just one weekend.
Why Build Instead of Buy?
Custom Fit: You can make them exactly the length of your wall nook.
Heavy Duty: Unlike the cheap particle board shelves you buy at big-box stores, these are screwed into the wall studs. They can hold heavy books and dishes without sagging.
Budget Friendly: We are using standard lumber and plywood.
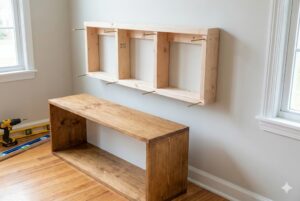
The Design: How It Works
Before we cut any wood, you need to understand the “trick.” We are actually building two parts:
The Bracket (The Frame): A simple ladder-like frame made of 2x4s that screws into the wall studs.
The Box (The Shelf): A hollow wooden box (made of thinner wood) that slides over the bracket like a sleeve.
Once the box is slid on, you screw it in place, and the internal bracket disappears. Magic!
Materials & Tools List
Materials (For two 3-foot shelves)
(2) 2×4 Boards: For the internal frame (The hidden part).
(1) Sheet of 1/4 inch Plywood or 1×10 Lumber: For the top, bottom, and front of the shelf (The visible part).
Tip: If you want a rustic look, use Pine. If you want a premium look, check out our guide on Best Wood Types for Beginners.
Wood Glue: Essential for strength.
3-inch Wood Screws: To attach the frame to the wall studs.
1.5-inch Finish Nails or Brad Nails: To assemble the box.
Tools Needed
Stud Finder: This is non-negotiable. You cannot hang these on drywall alone!
Level: Crooked shelves will drive you crazy.
Drill & Saw: See our 7 Must-Have Tools Guide if you are missing these.
Tape Measure: Precision is key.
Step 1: Find and Mark Your Studs
This is the most critical step for safety.
Decide where you want your shelves.
Use your stud finder to locate the vertical wooden beams (studs) behind your drywall.
Mark the center of every stud with a pencil.
Important: Draw a level line across the wall where the shelf will go. This line will be your guide.
Warning: Never guess where the studs are. If you miss the stud, your shelf will rip out of the drywall and fall.
Step 2: Build the Internal Frame (The Bracket)
We need to build a “ladder” that fits your space.
Cut a 2×4 to the desired length of your shelf (e.g., 36 inches). This is the back piece that goes against the wall.
Cut “Fingers”: Cut smaller pieces of 2×4 (about 5-6 inches long). These will stick out from the wall to support the shelf.
Assemble: Screw the “fingers” into the long back piece. Space them out so they do NOT block the spots where your wall studs are.
Note: You usually want a finger on each end and one or two in the middle.
Step 3: Mount the Frame to the Wall
Now, let’s put that frame on the wall.
Hold your ladder frame up to the line you drew in Step 1.
Check for Level: Put your level on top of the frame. Adjust until the bubble is perfectly in the center.
Drive the Screws: Drive your 3-inch screws through the back of the frame and deep into the wall studs. Use at least two screws per stud for maximum strength.
Now, grab the frame and try to hang on it (carefully!). If it doesn’t budge, you are ready for the next step.
Step 4: Build the “Hollow Box”
Now we need to make the pretty cover that hides the ugly 2×4 frame.
Measure the Frame: Measure the exact length and depth of your mounted frame.
Cut your Plywood/Boards:
Top piece
Bottom piece
Front face piece
Two small side pieces (end caps)
Test Fit: The box needs to be snug, but not so tight that you can’t slide it on.
Pro Tip: Remember the Kerf Mistake! Account for the thickness of your wood when measuring.
Step 5: The Slide and Secure
Apply a little wood glue to the top and bottom of the internal frame fingers.
Slide your hollow box over the frame. It should fit like a glove.
Push it all the way back until it touches the wall.
Lock it in: Use your drill or a hammer to drive a few small finish nails (or brad nails) through the top of the shelf into the 2×4 frame underneath. This stops the box from sliding off.
Step 6: Sanding and Finishing
Now for the fun part—making it look expensive.
Fill the Holes: Use a little wood putty to fill the tiny nail holes.
Sand: Sand the entire shelf smooth. Start with 120 grit and finish with 220 grit.
Stain or Paint: Apply your favorite wood stain (like Walnut or Oak) or paint it white for a modern look.
Protection: Apply a coat of polyurethane to protect the wood from water rings or scratches.
Conclusion: Style Meets Storage
You did it! You took some rough lumber and turned it into a sleek, modern piece of furniture.
Floating shelves are addictive. Once you build one, you will want to put them in the kitchen, the bathroom, and even the garage. They are the perfect project to practice your measuring, cutting, and assembly skills.
Now, go find some nice books or a plant to put on your new masterpiece. You’ve earned it!
Frequently Asked Questions (FAQs)
Q: How much weight can these shelves hold? A: Since we screwed the frame into the wall studs, these are incredibly strong. A properly built 2×4 floating shelf can easily hold 50+ lbs (dishes, books, etc.). Just make sure you hit the studs!
Q: Can I use drywall anchors instead of studs? A: I strongly recommend against it for floating shelves. Because of the leverage (the shelf sticking out), drywall anchors will likely pull out over time, causing the shelf to sag or fall.
Q: My shelf is tilting forward (sagging). How do I fix it? A: This usually happens if the “fingers” of the frame aren’t tight inside the box. You can shim the bottom of the bracket (put a thin piece of cardboard behind the bottom edge of the frame against the wall) to tilt the shelf slightly upward before you slide the box on.