Does your neck hurt after looking down at your laptop screen for hours? Do you feel that burning sensation in your shoulders at the end of the workday?
You are not alone. It’s called “Tech Neck,” and it happens because laptops are designed for portability, not ergonomics. The screen is too low, forcing you to hunch over.
You could buy a cheap plastic stand from Amazon, or spend $100 on an aluminum one. But why do that when you can build a stunning, custom wooden stand for less than $10?
In this guide, I will show you how to build a simple, sturdy, and beautiful laptop riser. It lifts your screen to eye level, improves airflow to keep your laptop cool, and gives you extra desk space to hide your keyboard.
Best of all? You can build it with scrap wood in just one afternoon.
Why Wood is Better Than Aluminum
Aesthetics: Wood adds warmth to your desk setup. It looks premium and custom.
Stability: A solid wood stand doesn’t wobble or vibrate when you type.
Customization: You can build it to the exact height you need for your eyes, not a generic “one size fits all.”
The Design: The “C-Shape” Riser
We are building a simple “C-Shape” or “U-Shape” riser. It has a top platform for the laptop and two sturdy legs. This design creates a tunnel underneath where you can slide your external keyboard and mouse when you aren’t using them.
Materials & Tools List
Materials
Plywood or Solid Wood: A piece of 1/2 inch or 3/4 inch plywood works great. If you want a luxury look, use Walnut or Oak.
Tip: If you are unsure about wood choice, read our guide on Best Wood Types for Beginners.
Wood Glue: Titebond II or III.
1.5-inch Finish Nails or Screws.
Wood Stain/Finish: To match your desk.
Adhesive Rubber Feet: (Optional) To stop it from sliding.
Tools Needed
Saw: Circular saw or Jigsaw.
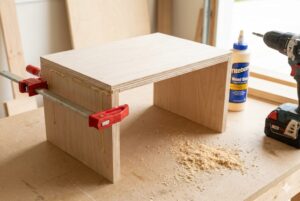
Clamps: Essential for the glue-up.
Sandpaper: 120 and 220 grit.
Drill: If using screws.
Step 1: Measure Your Ideal Height
Before you cut, sit at your desk comfortably. Look straight ahead. Measure the distance from your desk surface to your eye level.
Ideally, the top of your laptop screen should be at eye level.
Subtract the height of your laptop screen itself.
The remaining number is how tall your stand needs to be (usually 4 to 6 inches).
Step 2: The Cut List
You need three simple pieces. Let’s assume you want a standard riser.
Top Platform: 14 inches wide x 10 inches deep. (Adjust this to fit your specific laptop size).
Legs (Make 2): 10 inches deep x 5 inches tall (or your custom height).
Pro Tip: If you want a slanted design (typing angle), cut the legs at a 15-degree angle. But for a simple riser (where you use an external keyboard), square cuts are better.
Step 3: Assembly (The Joinery)
You have a few options to join the legs to the top:
Option A (Easiest): Glue and Nail. Apply glue to the top edge of the legs, place the platform on top, and drive finish nails down through the top into the legs.
Option B (Cleanest): Pocket Holes. If you have a Kreg Jig, drill pocket holes on the inside of the legs and screw them upwards into the top. This hides all the screws.
Option C (Strongest): Countersunk Screws. Drill pilot holes through the top, drive screws in, and cover the heads with wood filler or button plugs.
Wait! Before you attach the legs, do you want cable management?
Optional Step: Drill a 1-inch hole in the center of the Top Platform near the back. This lets you route your charging cable cleanly through the stand.
Step 4: Add a “Stop Block” (Safety Feature)
If you built a slanted stand, your laptop might slide off.
Cut a small strip of wood (1/2 inch tall x 14 inches wide).
Glue and nail it to the front edge of the top platform.
This creates a lip that catches your laptop and keeps it safe.
Step 5: Sanding for Smoothness
Since your hands and expensive electronics will be touching this, it needs to be baby-smooth.
Start with 120 grit to remove any glue squeeze-out or rough saw marks.
Finish with 220 grit.
Pay special attention to the sharp corners. Round them over slightly so they don’t scratch your wrist or your laptop.
Step 6: Finishing
Now, make it pop!
Paint: Matte black looks very modern and hides plywood edges well.
Stain: If you used real wood, apply a nice stain followed by Polyurethane.
Confused about the finish? Check our guide on Polyurethane vs Varnish.
Let it cure: Don’t put your heavy laptop on it until the finish is 100% hard (usually 24 hours).
Step 7: The Final Touch
Flip the stand over and stick 4 adhesive rubber feet to the bottom of the legs.
This protects your desk from scratches.
It stops the stand from sliding around while you work.
Conclusion: Upgrade Your Workspace
You just saved yourself $50 and saved your neck from pain.
This simple wooden stand changes the entire look of your desk. It turns a cluttered mess into a professional workstation. Plus, you can now slide your keyboard underneath when you are done for the day, giving you space to write or draw.
Build one for yourself, and I guarantee your coworkers (or family) will ask you to build one for them too!
Frequently Asked Questions (FAQs)
Q: Does wood make the laptop overheat? A: Actually, lifting the laptop improves cooling. Most laptops vent hot air from the bottom or back. By getting it off the desk, you increase airflow. If you are worried, you can drill extra ventilation holes in the top platform of your stand.
Q: Can I build this out of MDF? A: Yes, MDF is great for painting. Just remember that MDF dust is toxic, so wear a mask!
Q: How do I hide the plywood edges? A: If you use plywood, the edges show layers. You can buy “Iron-on Edge Banding” from Amazon. It’s a strip of real wood veneer with glue on the back. You just iron it on the edge, and it looks like solid wood!