There is nothing that boosts your home’s “curb appeal” faster than a beautiful wooden planter box on the front porch.
Go to a garden center, and you will see wooden planters selling for $100 or even $200. And the worst part? They are usually made of cheap staples and thin wood that will rot in two years.
Why spend a fortune when you can build a custom, high-end planter box this weekend for a fraction of the cost?
In this guide, I will show you how to build a modern, durable DIY planter using Cedar. It is rot-resistant, smells amazing, and looks incredibly professional. Whether you want to grow fresh herbs, flowers, or even small vegetables, this planter is the perfect home for them.
Why Cedar? (The Secret to Outdoor Woodworking)
Before we cut any wood, we must choose the right material. This box will live outside, in the rain, sun, and snow.
-
Cedar & Redwood: These are the gold standards. They contain natural oils that repel water, bugs, and rot. You don’t even need to seal them!
-
Pressure Treated Pine: It’s cheaper, but it contains chemicals (copper azole). If you are growing vegetables to eat, do not use pressure-treated wood unless you line the box with heavy plastic.
-
Standard Pine: Do not use untreated white pine. It will turn gray and rot within 12 months.
My Recommendation: Spend the extra money on Cedar Fence Pickets. They are cheap, rough-sawn, and perfect for this rustic look.
Materials & Tools List
Materials
-
Cedar Fence Pickets: 6-8 boards (usually 1×6 inch, 6 feet long). These are very affordable at Home Depot or Lowe’s.
-
2×2 Lumber: For the legs/corner posts. (Cedar or Pressure Treated).
-
Exterior Screws: 1.5-inch and 2.5-inch screws (Coated/Galvanized so they don’t rust).
-
Landscape Fabric: To line the inside (keeps soil in, lets water out).
-
Exterior Wood Glue: Titebond III.
Tools Needed
-
Miter Saw or Circular Saw.
-
Drill/Driver.
-
Staple Gun: To attach the fabric liner.
-
Tape Measure.
-
Sander: With 80 and 120 grit paper.
Step 1: Determine Your Size
One of the best parts of DIY is customization.
-
The Cube: 18″ x 18″ (Great for small porches).
-
The Rectangle: 36″ x 18″ (Great for under windows or along walls).
For this tutorial, we will build a standard rectangular planter (24″ long x 16″ wide x 18″ tall).
Step 2: Cut the Legs and Slats
-
The Legs: Cut 4 pieces of your 2×2 lumber to 18 inches long.
-
The Short Slats (Sides): Cut 6 pieces of cedar picket to 13 inches long.
-
The Long Slats (Front/Back): Cut 6 pieces of cedar picket to 21 inches long.
-
The Bottom Supports: Cut 2 pieces of 1×2 or scrap wood to 13 inches long (these will hold the floor).
Note: Cedar fence pickets are rough. Give them a quick sanding with 80-grit paper before assembly to avoid splinters.
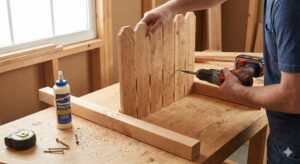
Step 3: Build the Side Panels
We start by building the two short sides.
-
Lay two Legs flat on your table.
-
Place your Short Slats across them. Ideally, the slats should be flush with the outside edge of the legs.
-
Spacing: You can push the slats tight together for a solid look, or leave a tiny 1/4 inch gap for a modern “slatted” look.
-
Attach: Apply waterproof glue and screw the slats into the legs using 1.5-inch screws.
-
Pro Tip: Drill pilot holes! Cedar splits easily near the ends.
-
Repeat this for the other side. You now have two “H” shaped panels.
Step 4: Connect the Panels
Now we turn the panels into a box.
-
Stand your two side panels up.
-
Take your Long Slats and bridge them across the two panels.
-
Screw them into the legs just like you did before.
-
Ensure the box is square (measure diagonally from corner to corner; the numbers should be the same).
Now you have a hollow wooden box frame!
Step 5: The Floor and Drainage
This is where many beginners fail. A planter needs excellent drainage, or the roots will rot.
-
Install Cleats: Take your “Bottom Support” pieces and screw them to the inside of the short sides, about 2 inches up from the bottom edge.
-
Add Floor Boards: Cut cedar scraps to fit across these supports. Lay them down to create a floor.
-
Gaps are Good: Do not pack the floor boards tight! Leave big 1/2 inch gaps between them. We want water to pour out of the bottom freely.
Step 6: The Top Trim (Optional but Recommended)
To hide the rough end grain of the legs and give it a “finished furniture” look:
-
Cut 4 pieces of cedar with 45-degree miter cuts (like a picture frame).
-
Nail or screw them to the top rim of the box.
-
This creates a nice lip to grab when moving the planter.
Step 7: Lining the Planter
You should never put soil directly against the wood, even Cedar. Wet soil keeps the wood permanently damp, which accelerates rot.
-
Take Landscape Fabric (weed barrier).
-
Staple it to the inside of the box.
-
This fabric holds the dirt inside but allows water to drain out through the floor gaps.
Step 8: Finishing
Cedar turns a beautiful silvery-gray as it ages in the sun.
-
Natural Look: Leave it alone! It requires zero maintenance.
-
Warm Look: Apply a coat of Boiled Linseed Oil or an outdoor deck sealer with UV protection. This keeps it looking like new wood for longer.
-
Avoid: Do not use Polyurethane outdoors. The sun will cause it to peel and flake off like sunburned skin.
Conclusion
Congratulations! You have just upgraded your outdoor space.
This planter box is heavy, durable, and looks like it came from a high-end garden catalog. Fill it with potting soil, plant some bright Marigolds or trailing Ivy, and place it by your front door.
If you enjoyed this project, why not build a matching Birdhouse to hang above it?
Frequently Asked Questions (FAQs)
Q: Can I put wheels on this? A: Yes! Heavy-duty caster wheels are a great addition. Screw them into the bottom of the 2×2 legs. This makes it easy to move the planter into the sun or shade.
Q: Do I need to put rocks in the bottom? A: Old gardening advice said yes, but modern science says no. Rocks actually raise the water table in the pot. Just use good potting mix and rely on the floor gaps for drainage.
Q: Can I use pallets for this? A: You can, but be careful. Pallet wood is usually Pine or Oak and will rot quickly outdoors unless heavily painted or sealed. Also, check stamps on pallets to ensure they weren’t treated with toxic chemicals (look for “HT” which means Heat Treated, that is safe).