There is one project that every woodworker builds at least once in their life: The Birdhouse.
It is the classic “first project.” Why? Because it requires very little wood, simple cuts, and if you make a mistake, the birds won’t complain!
But building a birdhouse isn’t just about nailing six pieces of wood together. If you want birds to actually live in it, you need to follow a few simple rules about ventilation, hole size, and safety.
Why Build Your Own?
Sure, you can buy a cheap plastic birdhouse at the dollar store. But those are often dangerous for birds (they get too hot).
-
Bird Safety: We will use thick wood that insulates the nest from heat and cold.
-
Customization: You can paint it to match your house (safely).
-
Satisfaction: Watching a family of Bluebirds or Wrens raise their chicks in a box you built is an amazing feeling.
The “One-Board” Design
We are going to use the famous “One-Board” method. This means you can build the entire house from a single 1×6 pine or cedar board (6 feet long). No waste, low cost.
Materials & Tools List
Materials
-
1×6 Lumber: One board, 6 feet long.
-
Pro Tip: Cedar is the best choice. It is naturally rot-resistant and bugs hate it. If you use Pine, you will need to paint the outside to protect it. NEVER use “Pressure Treated” wood (greenish tint)—the chemicals are toxic to baby birds.
-
-
1.5-inch Galvanized Nails or Exterior Screws.
-
Wood Glue: (Optional, but adds strength).
Tools Needed
-
Saw: Circular saw, miter saw, or even a handsaw works fine.
-
Drill: To make the entry hole.
-
Spade Bit or Hole Saw: The size depends on the bird (see Step 3).
-
Tape Measure & Pencil.
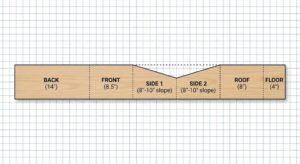
Step 1: The Cut List
Take your 1×6 board and mark these cuts. Remember to measure twice!
-
Back Piece: 14 inches long (This is long because it sticks out the top and bottom for mounting).
-
Front Piece: 8.5 inches long.
-
Sides (Make 2): 8 inches long on one side, sloping up to 10 inches on the back side. (This slope creates the slanted roof to shed rain).
-
Roof: 8 inches long.
-
Floor: 4 inches long.
Note: Don’t worry if your measurements are off by 1/8th of an inch. Birds don’t carry tape measures!
Step 2: The Most Important Part (The Hole)
The size of the entry hole dictates which bird will move in. If the hole is too big, predators (like squirrels or hawks) can get in.
-
1 1/8 inch: For Wrens and Chickadees.
-
1 1/2 inch: For Bluebirds and Swallows (Most common).
-
Does it need a perch? NO! Do not put a little stick (perch) under the hole. Predators use the perch to stand on and attack the eggs. Birds can fly straight into the hole without help.
Action: Drill your hole in the Front Piece, about 6 inches up from the bottom.
Step 3: Ventilation and Drainage
We don’t want the babies to drown or overheat.
-
Drainage: Drill four small (1/4 inch) holes in the corners of the Floor piece. This lets rainwater drain out if it blows in.
-
Ventilation: Drill two small holes near the top of the Side pieces. This lets hot air escape during summer.
Step 4: Assembly (The Fun Part)
-
Attach Sides to Back: Nail the two side pieces to the long back piece. Make sure the slope matches (high side against the back).
-
Add the Floor: Fit the floor piece between the sides. Pro Tip: Recess the floor up inside the box by 1/4 inch instead of flush with the bottom. This stops rain from dripping inside.
-
Add the Front: Nail the front piece on.
-
The Roof: Nail the roof on top. It should overhang the front to protect the hole from rain.
Step 5: The “Clean-Out” Door
Birds are messy houseguests. After the babies fly away, the nest will be dirty. You need to clean it out for the next family.
-
The Trick: When nailing the Front Piece, only use nails at the very top. Use a single screw at the bottom.
-
How it works: When you need to clean it, just remove the one screw, and the front door pivots open!
Step 6: Finishing and Painting
Should you paint it?
-
Outside: Yes, you can paint the outside with water-based latex paint. Light colors are better (they reflect heat).
-
Inside: NEVER paint or stain the inside. The fumes can harm the birds, and baby birds need rough raw wood to grip onto when they are learning to climb out.
Step 7: Where to Mount It
You built it, now where does it go?
-
Height: 5 to 10 feet off the ground is ideal.
-
Direction: Face the hole East or South-East. This wakes the birds up with the morning sun but protects them from the hot afternoon sun and prevailing winds.
-
Location: Mount it on a fence post or a standalone pole. Trees are okay, but cats can climb trees easily.
Conclusion
Building a birdhouse is a simple act of kindness for nature. In a world where we cut down so many trees, giving birds a safe place to nest is a small way to give back.
Plus, is there anything better than sitting on your porch with a cup of coffee, watching a bluebird feed its chicks in a house you built?
If you build this, send me a photo! I’d love to see your design.
Frequently Asked Questions (FAQs)
Q: Why don’t birds like my birdhouse? A: Be patient! It often takes a season for birds to “trust” a new house. Also, make sure it isn’t swinging in the wind (birds prefer stable houses) and isn’t too close to a bird feeder (birds don’t like neighbors near their nest).
Q: What wood is safest? A: Cedar or Redwood. They don’t need chemicals to survive the rain. If you use cheap Pine, just paint the outside well.
Q: When should I put it up? A: Late winter or very early spring is best. Birds start scouting for homes in February/March.