There is a specific kind of magic in taking a rough piece of lumber and turning it into a coffee table, a jewelry box, or a bookshelf. But let’s be honest: between the dream of the finished project and the reality of your workshop, there is a lot of frustration.
Every woodworker, from the weekend warrior to the master craftsman, has a scrap pile full of mistakes. The difference is that the master craftsman made those mistakes years ago and learned from them.
If you are just starting out, you don’t have to learn everything the hard way. By identifying the most common pitfalls, you can save money on lumber, keep all your fingers intact, and build furniture you are actually proud to display.
Here are the most common woodworking mistakes beginners make, and exactly how to fix them.
1. The “Measure Once, Curse Twice” Syndrome
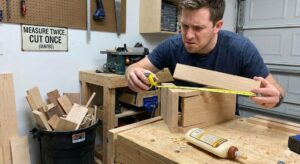
We have all heard the golden rule: Measure twice, cut once. It is the oldest cliché in the book, yet it remains the number one reason projects fail.
forgetting the Kerf
The most technical measuring mistake beginners make is ignoring the “kerf.” The kerf is the width of the material that the saw blade turns into sawdust.
If you mark a line at exactly 10 inches and cut right down the middle of that line, your board will be shorter than 10 inches because the blade ate 1/8th of an inch of wood.
The Fix: Always cut on the waste side of your line, not the center.
Inconsistent Measuring Tools
The Fix: Stick to one primary measuring tool for a single project to ensure relative consistency.
2. Ignoring Wood Movement (The “Exploding Table” Effect)
Wood is not plastic. It is a biological material that acts like a sponge. Even years after it has been cut, wood continues to expand and contract based on the humidity in your home.
Many beginners build a table by gluing the breadboard ends tight or screwing the top directly into the apron with no wiggle room. Six months later, when the seasons change, the wood wants to move but the screws won’t let it. The result? The wood splits or cracks with a loud pop.
How to Respect the Grain
Don’t cross-grain glue: Avoid gluing grain running perpendicular to each other over large surfaces.
Use proper hardware: When attaching table tops, use “Z-clips” or figure-8 fasteners that allow the wood to expand and contract without tearing itself apart.
3. The Glue Squeeze-Out Disaster
There is a moment of panic during glue-ups where you worry the joint won’t hold, so you slather on the glue. When you clamp it, glue drips everywhere. You wipe it with a wet rag and think you are safe.
You are not safe.
When you apply a stain or clear coat three days later, you will see blotchy, white patches where the glue sealed the wood pores. Wood glue acts like a resist; stain cannot penetrate it.
The Solution
The Wait-and-Scrape Method: Instead of wiping wet glue (which pushes it deeper into the pores), wait about 20–30 minutes until the glue is rubbery. Then, use a chisel to peel it off cleanly.
Blue Tape: Put painter’s tape along the joint lines before gluing. The squeeze-out goes on the tape, not the wood.
4. Skipping the Pilot Holes
We have all been there. You are in the zone, assembling a box, and you drive a screw straight into the end grain. The wood splits instantly.
A screw acts like a wedge. If you don’t remove some wood to make room for the screw shaft (the shank), the wood has to separate to accommodate it.
The Rule of Thumb
Always drill a pilot hole. The drill bit should be the same diameter as the solid shaft of the screw (not including the threads). This clears the path so the threads can bite into the wood without forcing it apart.
5. Rushing the Sanding Process
Sanding is boring. It is loud, dusty, and tedious. It is the part of the project everyone wants to finish quickly.
Beginners often jump straight to 220 grit or skip steps. Alternatively, they press down too hard on their random orbital sander. This leaves “pigtails” (little spiral scratches) that you might not see under workshop lights but will scream at you once the finish is applied.
The Progression Matters
You cannot skip grits. The purpose of 120 grit is to remove the scratches from the 80 grit. The 180 removes scratches from the 120.
The Sequence: Start at 80 or 100. Move to 120, then 150, then 180 or 220. Do not skip a step.
Pencil Trick: Scribble a light pencil line across your board before sanding. When the pencil marks are gone, you are done with that grit.
6. Buying Lumber Before You Have a Plan
Walking into a lumber yard or a big-box store without a “cut list” is dangerous for your wallet. Beginners often buy wood that looks nice, only to get home and realize it’s warped, twisted, or the wrong dimension for the project.
Understanding Lumber Dimensions
A “2×4″ is not actually 2 inches by 4 inches. It is 1.5″ x 3.5”. A “1×6″ is actually 0.75” thick. If you design your plans assuming the nominal size, your project will be completely off-kilter when you assemble it.
Checking for Flatness
Never buy a board without sighting it. Close one eye and look down the length of the board like you are aiming a rifle. Look for:
Bow: Curves like a banana.
Twist: Looks like a propeller.
Cup: Curved across the width. Avoid these boards unless you have the machinery (jointer/planer) to fix them.
7. Working with Dull Tools
A dull chisel or saw blade isn’t just frustrating; it is dangerous.
When a tool is dull, you have to use more physical force to make it cut. When you push harder, you lose control. If the tool slips, your hand is usually in the line of fire. A sharp tool requires less force and leaves a cleaner surface that requires less sanding later.
Tip: If you are burning the wood while cutting (you smell smoke), your blade is dull, dirty, or on backward.
8. Relying Solely on Glue or Solely on Screws
Woodworking is a balance of chemical bonds (glue) and mechanical bonds (fasteners/joinery).
Mistake A: Thinking screws are enough. Screws can snap or strip over time.
Mistake B: Thinking glue works on end grain. End grain is like a bundle of straws; it sucks the glue up, leaving the joint dry and weak.
A proper joint (like a mortise and tenon or a half-lap) relies on long-grain-to-long-grain glue contact. If you are doing a simple butt joint, you need screws or dowels to reinforce the glue.
9. Not Testing Your Finish
You have spent 40 hours building a beautiful oak cabinet. You buy a can of “Dark Walnut” stain, open it, and brush it onto your project.
Suddenly, it looks purple and blotchy. You hate it. But it’s too late.
Different woods absorb stains differently. Pine often blotches. Oak highlights the grain intensely. Walnut rarely needs stain at all.
The Scrap Wood Savior
Always keep the off-cuts from your project. Sand them to the same grit as your project, and test your stain and finish on those scraps. This is the only way to know exactly what the final color will look like.
10. The Perfectionist’s Paralysis
This is a mental mistake, not a technical one. Beginners often stop working because they made a small error, or they are afraid to start because they don’t have the “perfect” tools.
Woodworking is the art of fixing mistakes. Even the pros have gaps in their dovetails; they just know how to hide them with a mixture of sawdust and glue.
If you obsess over perfection, you will never finish. If a joint has a small gap, fix it and move on. If the table wobbles slightly, put a felt pad under one leg. The character of a handmade piece comes from the fact that it was made by hand.
Final Thoughts: Safety First
Before we wrap up, there is one mistake that trumps all others: Complacency with safety.
Never wear loose clothing or jewelry around spinning blades. Always wear eye protection and hearing protection. And never, ever use a power tool when you are tired or rushing.
Woodworking is a journey of patience. You will make mistakes—we all do. The key is to laugh at the sawdust, learn the lesson, and pick up the next board.
Happy building!